
Authenticating HubSpot means connecting a sending domain you control, so that HubSpot adds the DKIM, SPF, MX and DMARC records that prove your marketing and transactional emails are really yours. It takes under an hour of hands-on work, but the mistakes that cause most of the damage (a second SPF record, a duplicated DMARC record, the wrong domain connected, a policy tightened too early) are quiet ones, and they tend to surface as falling engagement rather than as an error message. This guide walks through the setup in the order you should do it, shows where each step usually goes wrong, and explains when it is worth having a deliverability specialist look at the result.
Table of Contents
- What HubSpot authentication actually does
- Choose the right sending domain first
- Connecting the sending domain and adding DKIM
- Configuring SPF when other services already send mail
- Adding DMARC without locking out your own mail
- Checking that it works
- The mistakes we would look for first
- Where a specialist saves you time
- FAQ
- Sources
What HubSpot authentication actually does
When you connect an email sending domain, HubSpot generates the records that authorise it to send marketing email on your behalf: MX, DKIM, SPF and DMARC. The practical consequence of skipping this is easy to miss. According to HubSpot’s overview of email authentication, unauthenticated sends are rewritten to a HubSpot-managed variable domain (it looks like your address followed by hs-domain.com), and you cannot use your own domain in the From address until DKIM is set up on a connected sending domain.
That matters because mailbox providers judge mail partly on whether the domain in the visible From address lines up with the domains that passed SPF and DKIM. HubSpot also notes that some providers, including Google and Yahoo, will require DMARC, DKIM and SPF to be fully set up on domains sending bulk email to their users, and that quarantined messages still show as delivered inside HubSpot while most recipients never see them. That last point is the one that catches teams out: the HubSpot dashboard can look perfectly healthy while a chunk of your sends has been quietly discarded elsewhere.
A short reminder of what each record does, for the people in the room who are not in DNS every day:
- SPF lists the servers allowed to send mail for a domain.
- DKIM adds a cryptographic signature to each message, so the receiving server can confirm it was not altered and that your domain authorised it.
- DMARC tells receiving servers what to do when a message fails those checks, and where to send reports about it.
If you want a broader grounding before you start, our plain-English explainer on SPF, DKIM and DMARC and why getting them wrong is costly covers the concepts without the HubSpot specifics.
Choose the right sending domain first
The most consequential decision happens before you touch any DNS. HubSpot’s guidance is to authenticate a domain that is not used for another purpose, such as hosting your website, and the connected domain should match the domain in your From address. A root domain can be used if it does not host content.
For shared-IP senders, HubSpot’s guide to email sending recommends a unique subdomain, such as news.example.com, kept separate from the subdomain that hosts your content. The reasons given are to prevent DNS conflicts and to protect the sender reputation of your root domain. A Starter subscription is required to connect a sending domain at all.
In practice, this is an architecture decision, not a tick-box. If your company already sends invoices, product notifications and sales outreach from the root domain, putting bulk marketing on the same domain ties the reputation of all of them together. Separating streams by subdomain means a complaint spike on a promotional campaign does not drag your password resets into the spam folder. We go further into this in our piece on sending architecture and authentication.
A sensible pattern for a growth-stage team looks like this:
| Stream | Example sending domain | Why separate it |
|---|---|---|
| Marketing and newsletters | news.example.com | Highest complaint risk, so it should not affect anything else |
| Product and transactional | mail.example.com | Needs the most reliable placement |
| Corporate and staff mail | example.com | Protected from bulk-sending reputation swings |
The subdomain names are only examples. What matters is that each stream has its own identity and that the From address in HubSpot matches the connected domain.
Connecting the sending domain and adding DKIM
HubSpot’s documented route is this. In your account, go to Settings, then Content, then Domains & URLs, then the Email Sending tab, and choose Connect sending domain. Enter an email address that you use to send marketing emails. You can then either sign in to your DNS provider so HubSpot can help, or set the records up manually.
If you go manually, HubSpot shows a table of records. For each one, copy the Host value and the Required data value exactly as shown into your DNS provider. This includes the two DKIM CNAME records, which are the part people most often mistype. A few habits save a lot of trouble:
- Paste the host carefully. Some DNS providers automatically append your domain to the host field. If yours does, entering the full hostname produces a doubled domain (something like selector.news.example.com.example.com) and the record will never verify.
- Keep CNAMEs as CNAMEs. Do not convert them to TXT records, and do not paste the target value into another field.
- Remove stray spaces and trailing characters that sneak in when copying from a browser.
- Record what existed before. Screenshot or export the current zone so you can roll back if something else breaks.
Then wait. HubSpot advises waiting at least 20 minutes before you verify; DNS changes usually take between 10 and 70 minutes but can take up to 48 hours. Clicking verify every two minutes tells you nothing. When you do check, the status appears in the Email Sending tab.
A note on who holds the keys: in many companies the marketing team owns HubSpot but IT or an external agency owns DNS. Agreeing in advance who can edit the zone, and how quickly, is often the real bottleneck. If you are in that position, it helps to know that how email hosting and DNS are managed differs by provider, so find out where your records are actually hosted before you raise the ticket.
Configuring SPF when other services already send mail
SPF is where most real-world HubSpot setups go wrong, because almost every business already has an SPF record. A domain may only have one SPF TXT record. If you add a second one for HubSpot, receiving servers see two and the check fails.
HubSpot’s troubleshooting guidance is to add HubSpot’s include statement to your existing record, after any existing includes. Their example looks like this:
v=spf1 include:anotherprovider.com include:123456.spf03.hubspotemail.net -all
The rules that follow from that guidance are worth keeping on a sticky note:
- Keep each include separated by a space.
- Stay within 10 include statements in total (SPF allows a limited number of DNS lookups, and exceeding it causes a failure).
- State v=spf1 once, at the start, and -all once, at the end.
- Avoid hard-coded IP addresses or CIDR ranges. If other providers’ hard-coded IPs have to stay, put HubSpot’s include after them and before -all.
- Remove any hard-coded HubSpot IPs, because the include updates automatically and a stale IP list will not.
It is also worth understanding what HubSpot’s SPF actually covers. Per HubSpot’s overview, SPF is traditionally checked on the envelope return-path domain, which HubSpot already configures for shared-server marketing email. Customers on a dedicated IP must configure SPF on their return-path domain during IP setup. HubSpot still highly recommends adding its SPF TXT record to the From address domain as well.
The ten-include limit is where growing companies get into trouble. A typical SaaS business accumulates a CRM, a support desk, a billing system, a transactional email service and a marketing platform, each with an include, and then adds HubSpot as number eleven. If you have reached that point, the answer is usually to move streams onto separate subdomains, each with its own short SPF record, rather than flattening everything into one. Our SPF record setup guide for UK teams goes through how to count and tidy includes.
Adding DMARC without locking out your own mail
DMARC is the record that turns SPF and DKIM results into a policy. HubSpot’s troubleshooting page lays out the constraints that trip people up:
- Only one DMARC TXT record, beginning with v=DMARC1, may exist. If there are several, receiving servers stop policy discovery and your policy is not applied.
- The version and policy tags are mandatory, for example v=DMARC1; p=YOUR_POLICY_VALUE;.
- Valid p and sp values are none, quarantine or reject, written in lower case.
- Alignment tags adkim and aspf should both be r (relaxed). HubSpot flags adkim=s; aspf=s; as incorrect and adkim=r; aspf=r; as correct.
The tags themselves, as HubSpot explains them, are simple enough. The p tag sets the policy: none for visibility only, quarantine to filter failures, reject to bounce them. The sp tag applies a policy to subdomains. The pct tag limits what percentage of failing messages the policy touches, so p=reject with pct=25 bounces 25 of every 100 failures. The rua and ruf tags take mailto: addresses for aggregate and failure reports.
Start at monitoring, then move on slowly
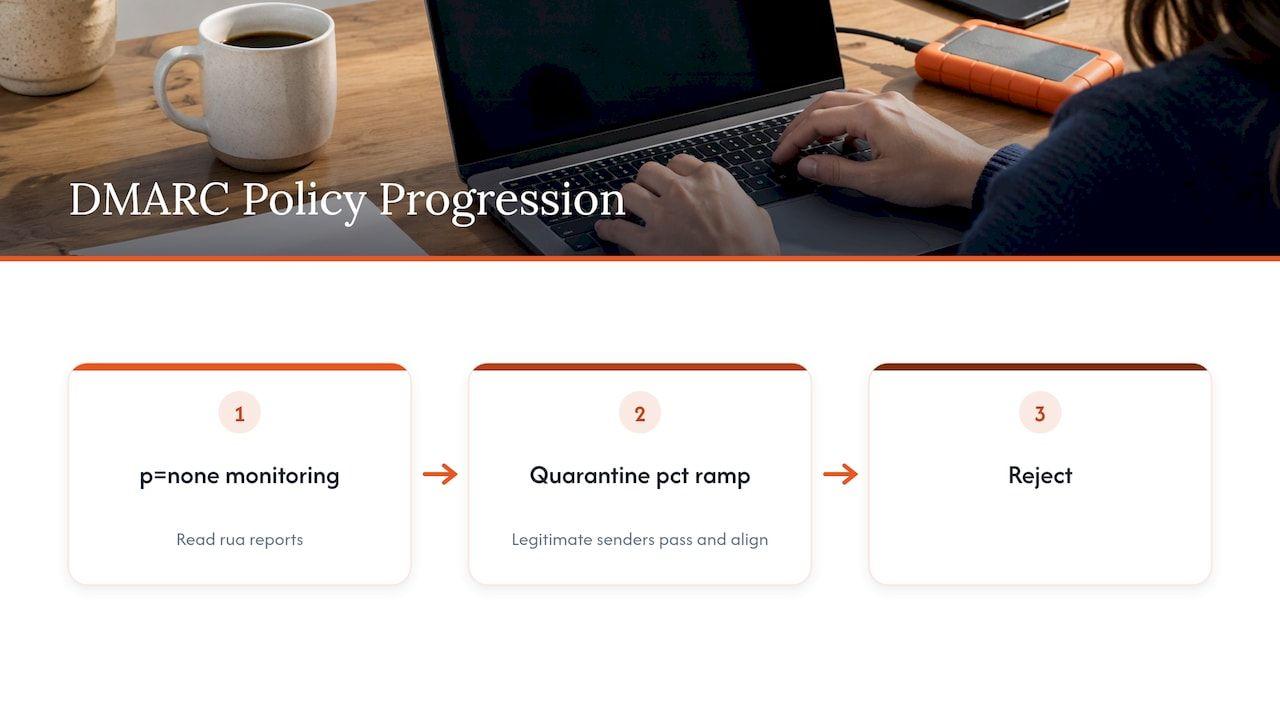
A safe first record on a domain that has never had DMARC is a p=none policy with an rua address that you actually read. It changes nothing about delivery, but it starts producing reports that show every system sending as your domain. Those reports regularly reveal something nobody remembered: an old survey tool, a finance system, an agency’s newsletter platform.
Only when every legitimate sender is passing and aligned should you move to quarantine, ideally using pct to ramp up, and later to reject. Tightening the policy on day one is the classic way to block your own invoices. We set out a staged approach in our 90 day DMARC plan for UK teams, and the DMARC sp tag plan covers how subdomain policy fits in when you have split your streams as suggested above.
Checking that it works
HubSpot gives three outside checks on its own documentation page, and they are the ones to run before you declare the job done:
- SPF: run an SPF record check with MX Toolbox. The result should show a record that includes include:shared.hubspot.com.
- DKIM: use MX Toolbox’s DKIM lookup with the selector smtpapi. A correct result contains k=rsa; t=s; p=MIG… and so on.
- DMARC: use dmarcian’s DMARC Record Checker to confirm that a record exists and parses.
All of this is laid out on HubSpot’s email authentication management page. After that, send yourself a real campaign email to a mailbox and look at the message headers: you want to see SPF and DKIM passing, and DMARC passing with the From domain aligned. A green tick in the HubSpot settings tells you the records exist. The headers tell you what the receiving server concluded.
It is also worth knowing that HubSpot treats any email address on a connected sending domain as verified. For paid subscriptions, its verification guidance recommends connecting a sending domain over verifying a single address, because connected domains have higher delivery rates and less spam placement.
The mistakes we would look for first
When results drop after a HubSpot launch or migration, a short list of causes accounts for most of what turns up on review:
- Two SPF records after someone added HubSpot’s as a new TXT line.
- Two DMARC records, often because an old one from a previous platform was never removed.
- Strict alignment tags copied from a generic template, which break legitimate HubSpot mail.
- DKIM never completed, so mail still goes out on the variable HubSpot domain even though everything else looks configured.
- The wrong domain connected, for instance the website’s root domain, or one that does not match the From address.
- A policy moved to reject before the reports were read.
- Authentication treated as the whole job. Records can all pass while the list is stale, the sending pattern is erratic or overlapping workflows hit the same contacts several times a week. Authentication gets you through the door, but it does not make people want the mail.
That last point deserves emphasis. Passing SPF, DKIM and DMARC means mailbox providers can identify you. It does not mean they will place you in the inbox. Reputation is built from bounces, complaints, engagement and who you are mailing, which is why we usually suggest looking at the first 48 hours of deliverability signals alongside the DNS.
Where a specialist saves you time
For a team with one domain, one sending platform and a clean list, the steps above are manageable in an afternoon. The picture changes when HubSpot is one of five or six systems sending as your brand, when you are migrating from another email platform, or when engagement has already dropped and nobody can say why. At that point the question is no longer “are the records present” but “which stream is being filtered and what is causing it”.
Digistrat is a UK-based deliverability consultancy, and authentication setup and remediation sits alongside our reviews of infrastructure, sender reputation and list quality. You work directly with a senior deliverability consultant who investigates the problem and implements the agreed fixes with your team, inside your platforms. Where it fits, there are three routes in:
- The free health check and the 15-minute inbox check-up call show where to start.
- An advisory session is a one-off £250, which suits a specific question such as how to structure sending domains for HubSpot before you commit to DNS changes. You can book an advisory session directly.
- Deliverability Review and Fix combines a detailed investigation with 45 days of implementation support, and Managed Deliverability adds daily monitoring, incident response, monthly inbox placement testing and one agreed improvement each month.
You can see how these fit together on our deliverability services page.
FAQ
Do I need to authenticate HubSpot if I already have SPF and DKIM for another tool?
Yes. Records for another platform do not authorise HubSpot. You need to connect the sending domain in HubSpot and add its DKIM CNAMEs, and you need to merge HubSpot’s SPF include into your existing SPF record. Without DKIM on a connected domain, HubSpot cannot send using your own domain in the From address.
How long does HubSpot DKIM verification take?
HubSpot suggests waiting at least 20 minutes before you try to verify. Most DNS changes appear within 10 to 70 minutes, though they can take up to 48 hours. If it still fails after a day, check the host values for doubled domain names and confirm that the CNAMEs have been entered as CNAMEs.
Should I use my root domain or a subdomain to send from HubSpot?
A dedicated subdomain, such as news.example.com, is HubSpot’s recommendation for shared senders, because it avoids DNS conflicts and protects the reputation of your root domain. A root domain is possible if it is not used to host content, but a subdomain keeps marketing reputation separate from your other mail.
What DMARC policy should I start with?
Begin with p=none and a reporting address in rua, so you can see every system sending as your domain without affecting delivery. Move to quarantine and then reject only once all legitimate senders are passing and aligned, using the pct tag to increase enforcement gradually.
My records all pass but emails still go to spam. Why?
Authentication only proves who you are. Placement also depends on sender reputation, complaint and bounce levels, list quality and how often overlapping workflows mail the same people. A review of those signals alongside your DNS usually finds the cause.
Sources
- HubSpot: Manage your email authentication
- HubSpot: Overview of email authentication
- HubSpot: Understand email sending in HubSpot
- HubSpot: Troubleshoot email authentication issues
- HubSpot: Verify the email address used to send marketing emails
- How email hosting works