Pull the sending IP straight from the bounce message, run it through Proofpoint’s PDR lookup, and if you control the receiving instance, add a local pdr_safe policy route immediately to restore business-critical traffic. File a global delisting request in parallel, then work through authentication and malware checks before removing the bypass. The local fix takes minutes; global delisting timing varies, so treat it as a follow-up task, not the first move.
Table of Contents
- Proofpoint blocking emails: the 10-point checklist for the first 90 minutes
- How do I read the NDR to find the exact cause?
- Using Proofpoint’s IP lookup and requesting global delisting
- Setting up a local bypass with pdr_safe policy routes
- How do I release messages stuck in Proofpoint quarantine?
- What actually stops Proofpoint blocking your emails long term?
- Monitoring and verification: how do you know it is actually fixed?
- How Digistrat handles Proofpoint block incidents
- What incident response actually teaches you about Proofpoint blocks
- How Digistrat can help you fix and monitor Proofpoint blocks
- Sources
- FAQ
Proofpoint blocking emails: the 10-point checklist for the first 90 minutes
When a client or supplier says your emails have stopped arriving, the clock matters more than the diagnosis. Work through these steps roughly in order, though several can run in parallel if you have more than one pair of hands on the incident.
- Open the bounce message and copy the exact rejection string, along with the sending IP address quoted in it.
- Run that IP through Proofpoint’s PDR lookup tool and screenshot the result for your incident log.
- If your organisation manages the receiving Proofpoint instance, add a pdr_safe policy route for that IP as an immediate bypass.
- If mail is hosted or filtered by a third-party ESP or provider, escalate to them straight away and ask them to check outbound scanning status and IP reputation.
- Check whether the block affects one sending IP or a whole range, since shared hosting often means your problem started with a neighbour.
- Notify the teams affected by the outage so nobody wastes time resending messages that are still being blocked.
- Assign a single remediation owner rather than leaving the fix to whoever happens to notice the bounce first.
- Log every action taken, with timestamps, so the delisting request and any later audit have a clear record.
- Check SPF, DKIM, and DMARC alignment on the sending domain while the bypass is in place, since misconfigured authentication is a common trigger.
- Set a follow-up reminder to review whether the bypass is still needed once global delisting completes.
Pro Tip: Keep a standing incident template ready before you need it. When mail stops flowing, nobody wants to be drafting a log format from scratch while the sales team is asking why their invoices haven’t landed.
How do I read the NDR to find the exact cause?
The non-delivery report (NDR) that lands in the sender’s inbox almost always tells you more than the panicked email that follows it. Proofpoint’s rejection strings follow a recognisable pattern, and learning to read them properly saves you from guessing.
Look for text resembling 554 Blocked - see https://proofpoint.com/postmaster/?ip=1.2.3.4, which Proofpoint’s own postmaster guidance confirms is the standard format for an outright block. The IP address embedded in that URL is the one you need for the lookup tool, and it is not always the IP you expect, particularly if mail is relayed through a shared platform or a marketing ESP.
The Received headers in the full message source tell the rest of the story. Reading from the bottom up, you can trace the path a message took from the originating mail transfer agent (MTA) through any intermediate relays to the point Proofpoint rejected it. This matters because a block on an intermediate relay’s IP, rather than your own domain’s dedicated sending IP, points to a completely different fix.
Two rejection codes come up repeatedly, and they mean different things for how urgently you escalate:
- 554 Blocked indicates the IP has been placed on Proofpoint’s Dynamic Reputation block list. This needs active remediation and, usually, a delisting request.
- 421 Deferred typically indicates throttling rather than an outright block, and Proofpoint’s own guidance on the difference notes that transient delays of this kind can clear on their own as sending patterns normalise.
Roughly speaking, a 421 is Proofpoint asking you to slow down; a 554 is Proofpoint telling you the door is shut until you prove the problem is fixed. Confusing the two wastes time, either by escalating a temporary throttle as an emergency or by underestimating a genuine block.
Using Proofpoint’s IP lookup and requesting global delisting
Once you have the sending IP from the NDR, the next job is confirming its status through the official channel rather than guessing from the rejection text alone.
- Visit Proofpoint’s PDR/DNSBL lookup page and enter the sending IP address exactly as it appeared in the bounce.
- Note the listing status, the reason category if one is given, and take a screenshot with a timestamp for your incident record.
- Gather supporting evidence before filing a delisting request: this typically means details of what caused the listing, remediation steps already taken, and confirmation of a clean sending period with no spam complaints.
- Submit the global delisting request through Proofpoint’s dynamic reputation article, which sets out both the delisting path and the recommended local bypass in the same procedure.
- Track the request and be ready to respond quickly if Proofpoint’s team asks for further clarification, since incomplete submissions are the most common reason a delisting request stalls.
Realistically, timelines vary depending on the severity of the original listing and how much evidence you can supply upfront. Some listings clear automatically once an IP has stopped sending spam-like traffic for a sustained period, while persistent or repeat offenders typically require a manual review before removal. Do not assume automatic clearance will happen on your timetable; that is exactly why the local bypass matters as a parallel measure rather than a replacement for the global request.
Pro Tip: Attach your PDR lookup screenshot to every delisting request, even when it feels redundant. It gives Proofpoint’s review team a timestamped reference point and tends to speed up the back-and-forth.
Setting up a local bypass with pdr_safe policy routes
While the global delisting request works through Proofpoint’s review process, an admin with access to the receiving Proofpoint Protection Server (PPS) instance can restore mail flow for a specific sender within minutes. This is the local delisting route, and it is worth understanding properly rather than treating it as a black box someone else configures.
The steps, as set out in Proofpoint’s own delisting documentation, run through the policy route interface:
- Navigate to System → Policy Routes and create a new route named something identifiable, such as
pdr_safe. - Set the condition to Sender IP Address, the operator to Equals, and enter the specific IP address or addresses you need to bypass.
- Confirm the route is enabled under the relevant Reputation Service settings so that PDR processing is skipped specifically for the IPs listed, rather than disabling reputation checking more broadly.
- Save and test with a small volume of mail before assuming the bypass has taken effect across all inbound traffic.
This is a scalpel, not a sledgehammer. A pdr_safe route should apply only to the exact IP or IPs causing the disruption, never to a wide range or an entire domain’s worth of infrastructure, because that reopens the door to genuinely malicious senders slipping through unchecked.
Document every bypass the moment you create it, including who requested it, why, and when it should be reviewed. Proofpoint’s guidance on PDR behaviour is clear that short-term bypasses need tight control and should be removed once validation is complete, precisely because an open bypass left in place after the underlying issue is fixed becomes an unmonitored gap in your filtering.
Pro Tip: Set a calendar reminder for seven days out on every pdr_safe route you create. It is astonishingly easy to fix the root cause, forget the bypass exists, and leave it running for months.
How do I release messages stuck in Proofpoint quarantine?
Not every blocked message triggers a hard bounce. A good number sit quietly in quarantine, and knowing how to find and release them properly is a separate skill from fixing the underlying block.
- Search the Proofpoint console’s quarantine digest or admin interface by sender address, subject line, or intended recipient to locate the specific message in question.
- Check whether user-level release is enabled for the recipient’s account, or whether the message requires admin approval before it reaches the inbox; this varies by organisational policy and by the type of quarantine (spam, bulk, or malware).
- Before releasing anything, scan the message again for attachments or links that may have triggered the original quarantine, since a legitimate sender’s account can still be compromised.
- Revalidate any embedded links against current threat intelligence rather than assuming a clean scan yesterday still holds today.
- Log the release, including who approved it and why, so the action is auditable if the same sender triggers quarantine again.
Proofpoint’s own explanation of filtering logic makes the point that quarantining rather than deleting outright preserves evidence and limits business disruption while genuine false positives get sorted out. That is precisely why a rushed, unlogged release is worse than a slightly slower, properly verified one.
What actually stops Proofpoint blocking your emails long term?
A local bypass and a successful delisting request solve today’s problem. They do nothing to stop next month’s repeat, which is where most organisations quietly fail.
Authentication is the foundation, and it is worth checking properly rather than assuming it is fine because nobody has complained recently:
- SPF records need correct syntax and must include every legitimate sending source, including third-party marketing platforms and transactional email services.
- DKIM signing should be active across every service sending on your domain’s behalf, not just your primary mail server.
- DMARC should be in place with reporting enabled, ideally moved through a staged enforcement approach (
p=nonetop=quarantinetop=reject) rather than jumping straight to strict enforcement and breaking legitimate mail in the process.
Beyond authentication, look hard at infrastructure. A web compromise generating spam through a contact form, a set of credentials phished from a staff member, or an outbound relay left open with weak configuration are all common root causes that get missed because the investigation stops once the block clears. Proofpoint’s threat reference material is explicit that malicious content and authentication failures sit alongside spam-like volume as the leading triggers for reputation-based blocking.
Sender behaviour itself often needs adjusting too. Separating transactional email (receipts, password resets) from marketing sends is one of the more effective fixes, since the two have entirely different sending patterns and mixing them on the same IP or domain confuses reputation systems. Staged volume increases and proper IP warm-up practices matter enormously for any new sending infrastructure, and skipping that step is one of the most common reasons a brand-new IP gets flagged within its first fortnight of use.

Pro Tip: If you send both marketing and transactional mail, get them onto separate subdomains with their own DKIM keys. It isolates reputation risk so a bad marketing campaign never takes your password-reset emails down with it.
Monitoring and verification: how do you know it is actually fixed?
Restoring mail flow once is easy. Proving it stays fixed is the part most incident responses skip, and it is the part that prevents you from having the same conversation again in six weeks.
Watch three sources consistently: your own MTA bounce logs for any recurrence of 554 or 421 codes, the Proofpoint quarantine logs for a drop in false-positive quarantines, and repeat PDR lookup results confirming the IP has stayed clear. For the first 72 hours after any bypass or delisting, check these at least twice daily; after that, weekly reputation checks are a sensible baseline for most sending volumes, tightening to daily if you are recovering from a serious incident.
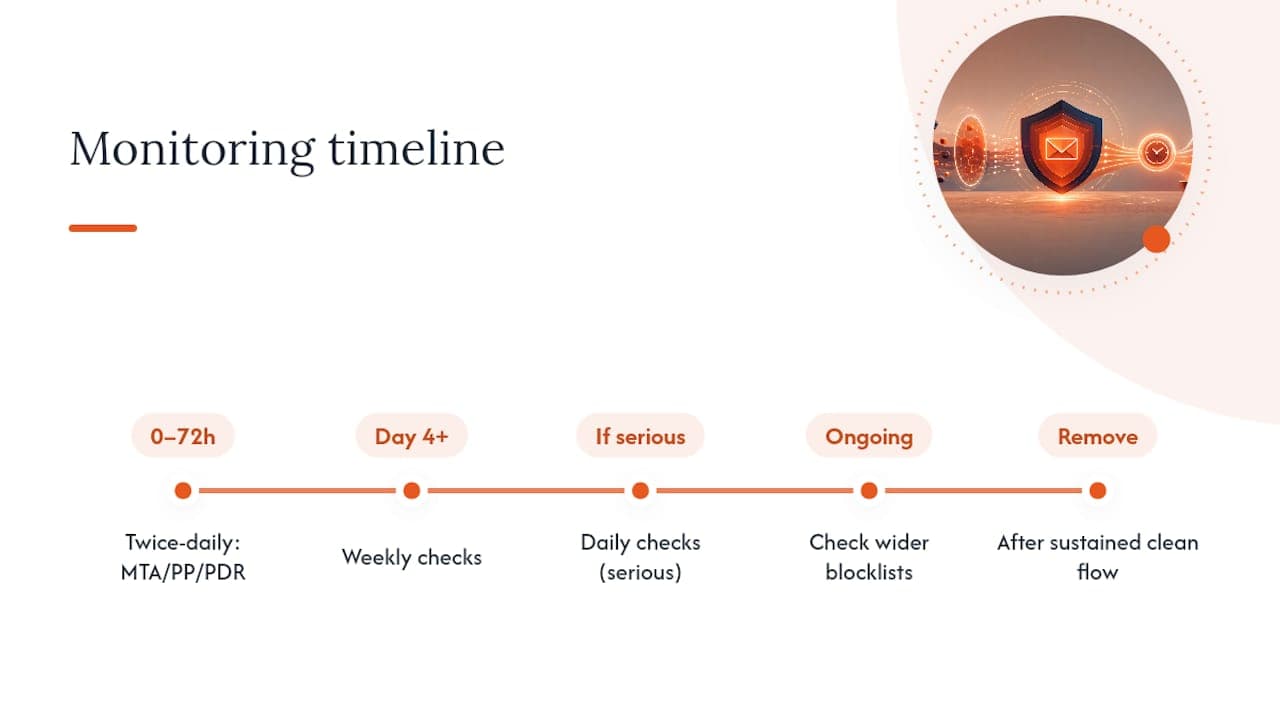
Only remove a temporary bypass once you have documented evidence that the root cause is fixed and mail has flowed cleanly for a sustained period, not simply because the immediate pressure has eased. Checking your domain against wider blocklists alongside Proofpoint-specific monitoring gives you a more complete picture, since reputation problems on one system often show up on others shortly afterwards.
How Digistrat handles Proofpoint block incidents
Digistrat’s triage on a Proofpoint block incident starts with the same header and log analysis this article walks through, then moves quickly into authentication verification and reputation remediation before setting up ongoing monitoring. Clients typically see fewer recurring blocks and measurably better inbox placement once the underlying causes, not just the symptom, are addressed. In-house teams handle the immediate bypass steps perfectly well; where specialist help earns its keep is diagnosing why the block happened in the first place and building the monitoring that stops it recurring, which is exactly the gap an email deliverability audit is designed to close.
What incident response actually teaches you about Proofpoint blocks
The blocks that turn into week-long ordeals almost always share the same root mistake: someone fixed the symptom and walked away. A pdr_safe route gets applied, mail starts flowing, and the authentication audit that should follow within days simply never happens because the pressure has lifted.
Communication with business stakeholders matters more than most admins credit. Tell them plainly, early, what has been done and what remains outstanding, rather than promising a fix is “sorted” the moment the bypass goes live. A short update explaining that critical mail flow is restored while root-cause work continues buys you far more patience than silence followed by a second outage.
How Digistrat can help you fix and monitor Proofpoint blocks
Bypasses and delisting requests solve this week’s crisis. What stops next month’s repeat is a proper look at why your infrastructure keeps triggering Proofpoint’s reputation systems in the first place, and that is precisely where Digistrat’s consultancy work for UK and European senders makes the difference between firefighting and actually being fixed.
Digistrat’s email deliverability audit examines your authentication setup, sending infrastructure, and reputation history to identify exactly why blocks kept happening, not just how to clear the last one. For organisations that have been through repeated incidents, ongoing reputation monitoring catches the early warning signs of a slipping sender score before it turns into another blocked mail flow. If you need someone on the call right now while a block is live, book a 90-minute advisory session and get a specialist working the incident alongside your team from the first hour, not after the third escalation email.
Sources
- Proofpoint Postmaster | Proofpoint US
- How to Delist a Sender From Proofpoint Dynamic Reputation (PDR) Block List
FAQ
Why is Proofpoint rejecting my emails?
Proofpoint rejects mail when it detects spam-like sending behaviour, malicious content, or authentication failures such as missing SPF or DKIM alignment, which shows up in the NDR as a rejection string like 554 Blocked.
How do I release blocked emails in Proofpoint?
Locate the message in the quarantine console by sender, subject, or recipient, verify it is genuinely safe by rescanning attachments and links, then release it through either the user-level release option or admin approval depending on your organisation’s permission settings.
Is Proofpoint having issues right now?
There is no single reliable way to check a live, organisation-wide status page for every Proofpoint deployment, since blocks are typically specific to your sending IP’s reputation rather than a platform-wide outage; check your own NDR and run a PDR lookup to confirm whether the issue is isolated to you.
How do I turn off Proofpoint email filtering?
You cannot simply disable Proofpoint as a sender outside the recipient’s organisation, since it is the receiving side’s filtering layer; the practical equivalent is requesting a pdr_safe policy route or global delisting so your legitimate mail bypasses the block while filtering continues for everyone else.